Save $1,298.32 by Building Your Camera From a Kit

For this week I’ve decided to tell you about one of my new favorites, the 35mm Do-It-Yourself
camera or the Gakken Flex
. This is a 35mm TLR (twin lens reflex) that you build yourself. The first thing that drew me to this camera was that it is a TLR, I have always wanted one, but they can be pricey. The second thing was that I got to put it together.

Gakken is produced by Otonanokagku, and each volume is a different science lesson. The kits have ranged from Theremins to Computers, Cameras, Phonographs and more. Each comes with a beautifully produced magazine that tells the history of the subject that you will be working on. Volume 25 has a great history of film and photography. Because of the popularity of these cameras they are being distributed by Recesky without the magazine, and can be found at Four Corner Store (Check to make sure they have them in stock.) I enjoyed putting it together, but really struggled because the instructions are in Japanese, and as I don’t speak or read Japanese I only had pictures to go from. The focus ranges from approximately 1ft. to infinty, there is only 1 appeture setting (best to use in bright sun), and there is only 1 shutter speed, approximately 1/60.

The great thing about these little darlings is that they use 35mm film, so you can get the film processed almost anywhere. The downside is that the frame is slightly larger than a regular 35mm so it will get cropped unless you have a special scan. But don’t fret, I have customized one of our scanners so you can get the whole frame, you just send your film to Reed Art & Imaging for the processing, proofing and scanning.

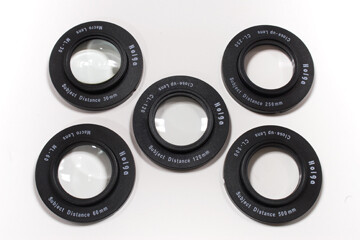
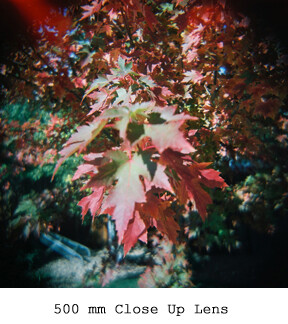
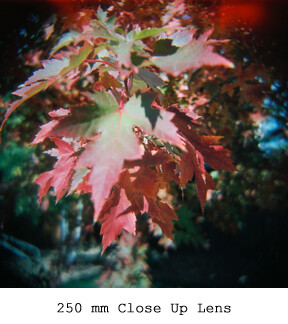
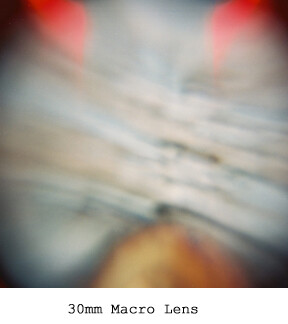
Here are some sample images that I have taken with mine. Note that you still get the blurred, vignette edges.

Photograph of a chinese yo-yo taken with a Gakken FlexPictured titled "Jungle Flare" taken with a Gakken FlexPicture titled "Steering Wheel" taken with a Gakken Flex

How to Add More Fun to Your Holga

Let’s talk about a fun accessory available for your Holga, the Macro and Close Up lens sets.Lens accessories for Holga toy cameraa These do have to be purchased separately, and they can be found at my two recommended shops, Four Corner Store and Light Leaks. These lenses just slide onto the front of the Holga lens, it is a tight fit so make sure to get them on all the way as it will effect the distance.

There are 5 lenses, 3 in the Close Up set and 2 in the Macro set. The Close Up set contains a 500mm, 250mm and 120mm. The Macro set contains a 60mm and 30mm. The tricky thing with these is getting the distance. For me it is easier to think of them in centimeters, mainly because I don’t have a measuring device that has millimeters on it. I have experimented with them a couple times and this last time was when I finally got something decent. With the Macro set it has been suggested that a flat object is best, I am still on the fence about that one. When using these lenses it is important to remember that the focusing distance is from the front of the lens. My first attempt, was measuring from the front of the camera. The Holga should be set to infinity when using the close up & macro lenses. Remember when using the Macro lenses because of the short distance the camera could block the light on the subject causing it to be too dark.

If you like Macro and Close Up photography this is definitely something you should add to your collection. Below are samples of what I got over the weekend. Don’t forget to leave questions or comments. Later!

500 mm lens accessory for Holga Camera250 mm lens accessory for Holga Camera60 mm lens accessory for Holga Camera30 mm lens accessory for Holga Camera

He Took a Risk and Landed the Shot

I have a fun story to share with you this week. I like to go out with a friend of mine and we both love take our Holgas. We always have fun and get some incredible shots. The thing I love most is how we will be at the same place, yet see and capture such diverse aspects. For one of our trips I wanted to journey back in my childhood, so we went to the elementary school I attended and a couple of the local parks I used to love going to. I went to photograph the old playground equipment that I used to play on everyday. I decided to invite my friend along to see how his shots might vary from my own, being that I had a emotional tie to the location and he didn’t.

Empty pool in the spring with melted snow runoffWe started the day at the elementary school and then headed over to the local park. The park is right next to a public swimming pool and a skate park. It was April so the pool was still closed for the winter, however, there was some water from melted snow. My friend decided he had to get a picture in the pool, so he jumped the fence to get the shot he wanted. While, I do not encourage or condone trespassing, a great photographer will do what is needed to get the shot. The park was busy with families out and about, it was one of the first nice days of the year, and I was concerned that he would get caught. Before he jumped the fence I told him I would play dumb and pretend I didn’t know him if he got caught, I also told him I wouldn’t pay bail . However, he managed to get in and out without any incident and ended up with a great shot (see left).

Below are a shot I took and a shot my friend took, as an example of how people photograph things differently. My shot is on left.

Geodesic playgroundRed Swing on playground


Have you taken any risks just to get the shot? Tell us your story. See you soon!

1 Easy Choice that Can Add Greater Creativity to Your Toy Camera Photos

Thanks for joining me again in our journey of toy cameras. I am going to answer the question: What are the different options once you have a exposed roll from your toy camera? Due to the fact that these toy cameras use either 120 film or a different aspect ratio on 35mm film you need to find a lab that can process Diana or Holga films, as your neighborhood 1 hour photo lab usually can’t. Which is why I am going to encourage you all to send your film to Reed Art & Imaging, because, well, this is a blog for Reed Art & Imaging. There are several toy camera enthusiasts working here and we take great pride in giving you the best from your toy cameras.

Picture named "Fire Hydrant" with normal film development

There are 3 types of film you can use in a toy camera, E-6 slide film, C-41 color negative film, or B&W negative film. If you are using either C-41 or E-6 these can also be artistically enhanced through a technique called: cross-processing. To cross-process you would process your C-41 negative film thru E-6 chemistry to get a slide or vice verse, E-6 slide film thru C-41 chemistry to get a negative. It is the chemistry that determines if the final film is a negative or a slide – not the film. This is a fun experiment I would encourage you to try as it causes an increase in contrast as well as unnatural colors. Check out the samples at the end of this article.

Whether cross processing or using normal film developing services, once the film gets processed there are a few options you have to choose from: There are proof prints, scans or contacts. With E-6 film it is already a positive, so you can’t contact them, however you can proof or scan them. I personally like to do small scans, usually 6mb, so that I can post them on facebook, my website and use them for editing. Several people choose to get proof prints, either 5×5 or 4×6 depending on the format of the mask you use. If you choose proof prints there is also an option to get a CD as well.

You may be asking yourself, “How do I know which type of film to use?”. This can be a difficult decision, but I will try to make it a little easier for you. I usually do not recommend using E-6 film, unless you are planning to cross-process. E-6 film is very sensitive and if your exposures are not accurate the images will be too light or dark, because of the limited control in your toy camera it is difficult to get the perfect exposure. C-41 color negative film or B&W negative film have more range in their exposures. WithCross processed film either you can be over- or under-exposed by almost a stop and still get usable images. With most toy cameras it is best to use a 400 ISO speed film. However, I would recommend experimenting for yourself. Just go out and have fun!

Next week I’m going to lighten it up a bit and let you know about some of the adventures in shooting I have had. Leave any comments or questions for me below. See you soon!

Above images taken with Fuji E-6 film and cross processed in C-41 chemistry.

Finding Your Toy Camera

Last time we covered what a toy camera is and I know that you are dying to get your hands on one. Therefore, in this blog post I am going to let you know where to find these amazing little things. There are many places to find these little gems. However, my favorite places are Four Corner Store, Light Leaks and Lomography. These stores have a wide variety of toy cameras and accessories. I prefer these stores because they cater strictly to the toy camera enthusiast.
These stores stock most of the Holga models, as well as almost every accessory available for the Holga. Four Corner Store also offer Holga bundles, which usually includes the camera, a few accessories, and some film. Every time I order from them I receive my order much sooner than expected, and if you “like” them on facebook they put up discount codes pretty regularly. They also offer a wide selection of other toy cameras. You can also get some of the toy cameras from B&H Photo Video or Freestyle Photographic Supplies. If you are itching for an original Diana then Ebay is your best option. However, the original Diana is a very hot item and they can be expensive, usually ranging from $50-$100. I was planning to get an original Diana until I saw how much they were going for, so I opted for the new Diana F+. Amazon is also a very good resource for toy cameras and supplies.

Ok, so you know what a toy camera is and where to find one. However, I know some of you are wondering what some of these images look like, so below are some sample shots taken with a Holga.

Photograph "Flowers in Gravel" shot with a Holga cameraPhotograph "Swinging Around"" shot with a Holga camera


Photograph "Waterfall" shot with a Holga cameraDon’t forget to come back next week, when we will look at the different options once you have a exposed roll of film. Thanks for visiting and see you next week!

Until then, remember to leave me your comments!

Toy Cameras: Holga and Diana

There are many different toy cameras out there, the most common ones being the Holga, theholga 120 Diana, and the Lomo LC-A.  So why are these cameras referred to as toys?  Well, cameras of this class usually include bodies and inner workings made of plastic, often the lenses are plastic too, giving images from these cameras their unique ethereal charm.  The lenses are fixed focal length, with limited aperture settings and shutter speeds.  The plastic construction of the camera is nowhere near as mechanically reliable as the expensive commercial cameras from makers such as Canon, Nikon, Olympus, Pentax and others.  With the toy cameras, there is a coveted tendency for light leaks and the el-cheapo plastic lenses are obviously not as crisp as expensive glass. These characteristics vary in quality and quantity in each camera, even within units of the same model.
I use mostly Holgas, and enjoy all 4 that I own, each for their individual traits; the light leaks are in different areas and the molded plastic lenses create different vignettes, blurs and lens-flairs.  This is why I find toy cameras to be so much fun; you just never know what you’re going to get.

Let’s quickly discuss some of the differences between the Holga and the Diana.
The Holga has several models to choose from: they have built-in flash, hot shoe adapters or no flash models, modified versions that use 35mm film or standard as 120 film, there are an abundance of accessories you can purchase for your Holga, or a number of modifications you can make to your Holga.  I will get into more detail with all of this in future posts.  The Holga has 2 aperture settings, labled as cloudy or sunny, which are so poor, they usually make little if any difference in exposure; a fixed lens; 4 focusing distances, labled as: individual (3ft), small group (6ft), large group (18ft) or mountains (30ft – infinity); 2 shutter settings, approximately 1/60 sec or bulb; it also comes with 2 film inserts, installed from the back, called masks, that alter the final image size on the film; a 4.5cm x 6cm and a 6cm x 6cm, although I prefer to shoot without the masks as they can decrease the light leaks.

The Diana has 2 versions, the original version (produced from the early 60’s thru the late 70’s) and a Diana cameranew version the Diana F+ (A re-production that entered the market in 2004).  The versions are basically the same except the newer Diana F+ has a nice pinhole function.  The original Diana shot 4cm x 4cm frames on a roll of 120 film, these cameras can still be found online or at flea markets, thrift stores or garage/estate sales, but because of their popularity, they command a premium price if the seller is aware of what they have.  Like the Holga, the new Diana F+ comes with film mask inserts, a 6cm x 6cm, a 4.5cm x 6cm, and an additional third mask, a 4cm x 4cm.  The Diana has 3 aperture settings, bright sunny, partly cloudy and cloudy, the Diana F+ has all of these plus pinhole; the Diana’s lens is a fixed lens, the Diana F+ has a removeable lens, so you can purchase different lenses and use them interchangeably; it is also possible to purchase a 35mm adapter back for the Diana F+.

I am so excited to share my love of toy cameras with you all.  Please come back and see what’s new.  I will be posting toy camera tips, tricks, holga and diana camera mods.  If there is anything in particular you want me to address add a comment to let me know.  See you soon!