Raw Versus JPEG – What They’re Not Telling You

In the ever-present quest for perfection, photographers from around the country call me weekly with questions about shooting raw versus jpeg. The debate over this topic has been waging strong on the internet since the advent of digital still-image capture. Creating confusion, every photo blogger and “expert” in the forums has their opinions. Each of them expressing “this is the right choice”.  Well today’s post is here to proclaim that it’s mostly bunk. There is no perfect answer that fits every photographer all of the time. The Holy Grail of file type is a myth and it’s time to stop looking for it and get on with the business of taking great images. The two camps in the JPEG versus RAW debate have strong emotional bonds to their “rightness” and are willing to go to great lengths – even as far as to embarrass themselves online while attempting to change the unchangeable minds of the opposing camp. They cling to the strategy of looking for evidence to support their case while ignoring the evidence of the other. In the end it just adds up to more confusion for the reader – who continues to be un-prepared to make their decision. If you are hoping this post will give you the right and perfect set-it-and-forget-it-forever options, you won’t find them, because I don’t think they exist – though you may find one that works for you most of the time. What you will find is unbiased data to help you make educated decisions before you enter a shooting scenario. You will also find enough data to see clearly why I made my bold statements against the “This is always the right way” mentalities.

Let’s get down to business
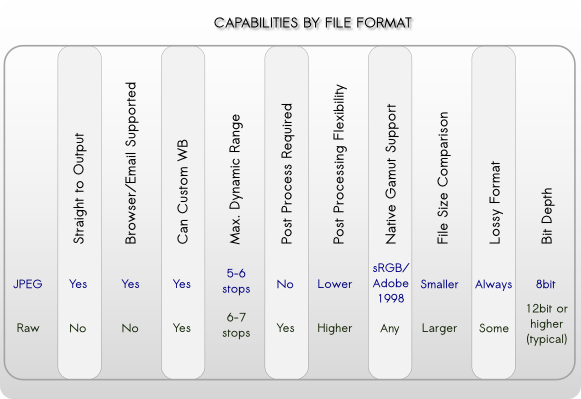
If you are a professional shooter, regardless of market you will likely have some of the following example criteria to consider as part of your decision making process:

    • On what standards do your customersdetermine quality of service?
      • How important is color accuracy?
      • How critical is the pixel depth (megapixels)?
      • Is dynamic range an issue?
      • What are your expected turn times from capture to delivery?
    • Technical issues
      • Are you shooting under controlled lighting and can control scene dynamic range?
      • What is the expected use of the image?  Web, press, photographic, pigment, all of them?
      • How large will the file be expected to print?
      • Do you have time for custom white balance?
      • Do you have time to verify exposure settings with a quality hand-held meter?
    • Business related
      • Do you see time as money?
      • Are you paying assistants or digital artists to post-process?
      • Are you paying your lab to color correct for you?
      • What is your present customer satisfaction rate and is there room for improvement?
      • Are you willing to spend some time, effort, and resources to impact product quality?
      • Do you expect your workflow to minimize the post-process impact on margins?

If you are a hobbyist, what are you looking to gain?

  • The best possible print.
  • To spend more time with family and less time with post-processing
  • To gain more control over the final image
  • To fit more images on the limited space of a card
  • Technical questions:
    • What is the subject matter?
    • Under what conditions am I shooting?
    • How will the image be used?
    • What is your personal criteria for quality?

Perspectives – it’s all a point of view
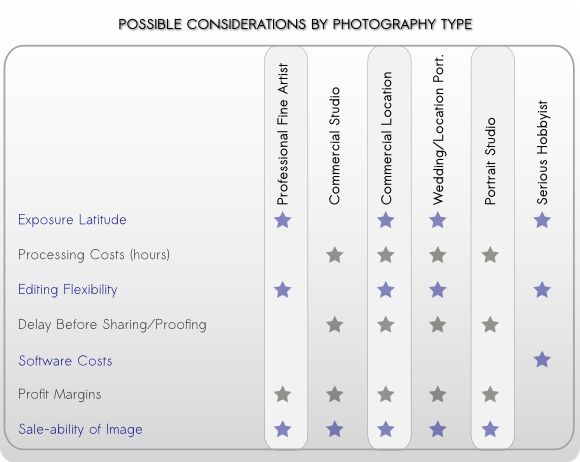
Before choosing your shooting format I recommend you first determine your priorities and make a list. When you know what is important to you, then the best choices can be made and most often with higher levels of confidence. For these examples, we’ll look at the typical requirements of each shooter type. Knowing the requirements will lead to understanding why a certain thing might be a priority. Photographers and business models vary, so results and opinions may differ. For the pro, they have to satisfy an end user in order to make a living. Often working with pro level tools to maximize image quality and speed the process. For some of the professional markets such as studios, time is an expense against the profit margin and customer experience may have the largest impact. For other business models such as fine art, it’s often maximum image quality that is the primary target. Studios are the business model most likely operating in some type of assembly-line type of workflow. They have dozens of images from each person or product shot and each of these files needs some kind of attention. Usually starting with elimination of the unusable, then selection of the prime images followed by editing. The artists that are paid to handle this process are usually compensated by the hour. The longer it takes to move a job through the work-flow, the deeper the cut into the bottom line. Quality needs to be maintained to meet or exceed the customer’s minimum expectations. The average consumer’s expectations are often that the professional print should exceed the quality of a drug-store print. As long as they can see a higher level print, that particular expectation is met (photographic skills such as composition aside for the intent of this discussion).  Skin-tones and most all other colors related to people photography fit will inside the sRGB colorspace. Studios have a great deal of control over their lighting, and thus the required dynamic range for the shoot. A good setup can usually hold within a 6 stop limitation of a JPEG work-flow. Interior location photography has additional challenges resulting from ambient conditions that might not be controllable. Office lighting, large windows, etc. can contribute to the overall lighting of a scene and may result in lighting ratios that exceed the 6 stop limit. In profit-centric people photography, merging brackets for HDR is rarely an ideal solution.

Commercial product photography has unique demands, especially when the product or person being photographed requires special staging and effects.
And yet the images themselves usually end up being used in the lowest of gamut conditions: 4-color press and the internet. In a complex shoot, where lighting, effects such as smoke or movement are in play, bracketing is not an option so maximum dynamic range is beneficial.  In table top product photography – think catalog photos – there is no movement, lighting is completely controllable and product colors rarely exceed the basic gamuts of Adobe1998 or sRGB. Since the subject does not move, bracketing can be used to maximize dynamic range.. Food photography brings the potential for highly saturated colors that would do well with a larger gamut and maximum control.  A commercial photo session often includes a day or more of styling, prep and active capture, followed by a similar amount of time in post. There are thousands if not ten’s of thousands of dollars at stake and final image quality can be critical to the customer’s end sales. Such diversity creates situations where JPEG would be most profitable and other times where a RAW work-flow is mandated.   The fine-art photographer is often most concerned with image quality. They seek an integrity in the image that jpeg does not deliver. Maximum dynamic range, sharpness, color fidelity and detail are all sought in the persute of the ideal print that meets the artist’s vision and the expectations of the descriminating print buyer. Fine art images are often heavily manipulated to create the mood sought by the artist and to bring out maximum detail. Through manipulation, detail along with any compression artifacts will also be brought to greater light. Artists will often use improper white balance to enhance mood and emotional response. The artist will often spend countless hours laboring over pre-planning of a shoot, and many financial resources are spent on models and assistants. The final editing is usually performed by the photographer rather than an assistant.

Pick a card, any card…
Prepared with the insights you now have into the requirements of a few professional photographer types, these charts should help clarify why one format type won’t properly cover every photographer’s needs, and how some photographer’s might benefit from both types during their day.

Jpeg Versus Raw, Capabilities by File Format Type

Basic Pros and Cons
Pros Cons
Raw
  • Can be any working space you have a profile for.
  • WB can be tuned post-capture.
  • Greater exposure latitude – though precise exposure is recommended.
  • Highest level of adjustment flexibility before causing gaps in histogram.
  • Best option if over-sampling is required.
  • Supported by Pro-level software
  • Non-lossy raw formats contain highest levels of color-fidelity
  • Takes the more time and resources to post process.
  • Larger in-camera and offline storage space requirements.
  • Must be processed before online sharing/distribution can occur.
  • Must be processed prior to printing
  • Additional software required.
  • Not supported by all editing software
Jpeg
  • Smaller file sizes maximize in-camera and offline storage space.
  • Proper WB and exposure can often go directly to print.
  • Easily shared via email and web with no additional work.
  • Lower time investments.
  • No additional software required.
  • Maximum software support both pro and consumer level.
  • Usually limited to sRGB or Adobe1998 at time of capture.
  • Any settings applied in camera i.e. WB, sharpening, noise reduction, etc. are “fixed” into the image – changes require post-capture retouching/editing.
  • Minimal exposure latitude of 1/8 stop.
  • Lossy format means you paid for resolution that you are sacrificing.
  • Typically does not over-sample well due to in-camera sharpening and compression related artifacts.

 Jpeg Versus Raw, Considerations by Photo Type

A successful photographer will learn the needs and expectations of their client, then support those needs through technical and artistic know-how, all the while minding the needs of the bottom line.

You can help our readers by sharing tidbits you have discovered regarding JPEG and Raw workflows in the comments below. And as always, we are here to answer your questions.

Wholesale Photo-Plaque Opportunities Available

If you have a retail or online business and are looking for a fast selling, highly profitable product, look no further!

Wholesale Photo-Plaques

sfyl logoASignOfWisdom.com has dedicated itself to selling our entire line of photo-plaques!
Choose from Travel, Inspirational, Humorous and Vintage.
To see our entire line, visit  www.asignofwisdom.com. Our line of products is a proven money maker in online storefronts such as amazon or ebay.

How to Get Great Color, Save Profits, and Never Have to Work Color or Density in Photoshop or Lightroom. Part 1

I’m going to fill you in on the secrets of how to get great color, save your
profits, and never have to work color or density in Photoshop. All without
the use of ICC profiles, confusing work-flows or batch conversions.
If you understood the above and it applies to you, chances are you are a
professional photographer. Professional print quality is much easier to achieve
than most photographers are aware.

Getting there requires Five crucial elements. With these five in place, you can go
directly from camera to print and get excellent results.

Yes, that’s right, higher profits and more free time with:
No Photoshop work.
No profiling magic.
No bag of tricks or fairy dust.

Rule #1 – If you have to adjust the density of your files, your metering is inaccurate.
You may find this hard to believe, but truly consistent spot-on exposures rarely come
from TTL metering. I know that’s tough to swallow, but reflective metering is just too fallible.

Don’t believe me? Here is a simple test to see if this rule applies to you.
1. Take a look at the average corrections you are making on your files in
Photoshop or Lightroom.
2. Jot down the number of exposure corrections you make in a work week.
3. If the answer is any higher than zero, guess what, I’m right – your TTL has failed you. So how do we correct this?
Get a GOOD new or used hand held incident flash meter, and calibrate it to your
camera using Will Crockett’s “Face mask Histogram Technique” copy and paste
the following web address into your browser: Go to
http://www.shootsmarter.com/index.php?option=com_content&task=view&id=116&acat=16
Keep in mind that digital cameras have only 1/8th stop of exposure latitude. If you
have an incident meter, compare it against Will’s meter reviews and see how it rates. Some
well known meters are unprofessionally inconsistent . Up to a horrible deviation of +- 1/3 stop from reading to reading. This is definitely outside of the acceptable range for a professional photographer and enough to put you back in an editing app to tweak density.

After you have calibrated your meter to your camera using the Face Mask Histogram, you have completed the first of a few simple steps towards a more efficient and predictable workflow. Take some test shots this week and fine tune your exposure calibrations to ensure you are keeping your highlight detail while maintaining good shadow detail.
Next time:
Part 2.

How to get Great Color, Save Your Profits, and Never Have to Work Color or Density in Photoshop. Part 2

My last blog post discussed the weakness of TTL metering and the need for spot on exposure to avoid working your files in photoshop. Thus saving money and time which should result in a more profitable business.

Rule #2 – If you don’t have proper white balance, you don’t have correct color.
This seems like a real “DUH!” statement, but it is astonishing how many pro’s still don’t grasp the importance of this.
Using auto white balance in a high-end professional workflow is a bad idea? Auto WB works if you have absolute
neutrals in your image, and even then it can be fooled by bright or near neutral tones in your subjects. If you are not getting consistent skin tones from sitting to sitting, or indoor to outdoor it’s time to adopt custom WB in your capture work-flow. And you wouldn’t dream of passing these auto white balance inconsistencies on to your final client prints – right?
The brief amount of time it takes to get an accurate custom white balance by using an accurate target can, and likely will, save your studio hours of Photoshop time.
And I am sure you know that in a pro studio:
Hours = (Profit – Dollars + extra time you could be getting more business).
And if you are paying staff to deal with exposure and white balance issues, don’t forget to add in payroll taxes and benefits to that equation. With accurate white balance control, you will NOT need to adjust the color of your files. Assuming of course that your camera is in a good state of repair. It is rare that the preset white balances on your camera will be accurate enough for professional standards.

To get an accurate WB, you need an accurate target.
If you are using a Kodak Grey card or one of those black/white/gray targets or a plastic over-the-lens diffuser, I would invite you to upgrade to something more accurate. If quality and/or profit margin are your #1 concerns; above all else get the most accurate WB target available. The Balance Smarter from the smart folks at BalanceSmarter.com.
Your color is only as good as the WB target you use. If you skimp here, you’ll pay the price later in additional work or reprints. Is it worth the risk?. After spending thousands on education, good gear and marketing to get business, seems a shame to put the investment and your reputation all on the line using a cheapo calibration target or tool.

If you are still tempted to take shortcuts during the shoot, every time you have the thought ” I’ll just fix it in Photoshop later”, say to yourself instead:
” I’ll just spend the time and money to fix it in Photoshop later”
Be Honest, isn’t the latter REALLY what you would be doing?

Next week:
Rule #3 – Using the right colorspace = great prints!

How to Get Great Color, Save Your Profits, and Never Have to Work Color or Density in Photoshop. Part 3

My last two blog posts discussed the critical need for spot-on metering and absolute correct white balance to avoid working your files in photoshop. Thus saving money and time which should result in better prints and a more profitable business.

Rule #3 – correct working space + Printer space = Great Print!
Digital cameras work extremely well in the sRGB space, and coincidentally, the Fuji Frontier/Noritsu printers of the world are designed to work within that space. Hmmmm, wonder why that would be….

Straight up – an sRGB work flow is your direct channel to go from camera to print. Shooting in Adobe1998 will not gain you any tonal range in the file. Both color spaces have the same levels per channel limit. And this is based on your camera’s bit depth, not your choice of working color space. Neither will any get whiter than 255, 255, 255 and neither will get any darker than 0,0,0.
You have black to white and the same number of levels in both. The gains are in the number of available colors. The larger the space the more colors. Typically these relate to high saturation colors that don’t often show up in most scenes.

These benefits of specific color spaces come into play on the output. Shooting in a color space that does not approximate that of your output device can lead to unpredictable color unless you are willing to spend the time converting to the output profile via a color managed workflow. That step can be sped up using batch processing, Remember, the goal here is to reduce your work load and still get a great print –  right?  Supplying a file to your printer in a mis-matched color space can result in saturation, contrast and color issues that will require intervention to get a good print. Again; Intervention = additional cost.

If you are shooting portraits and weddings, the largest percentage of your work prints 12×18 or smaller right? This means they go to our Fuji Frontier for printing on professional paper.
When  your work is more along the lines of fine-art, we strongly recommend a properly color managed work-flow that includes the use of output profiles. Your takeaway: Shoot in sRGB when printing to sRGB type devices. When printing to higher gamut devices, or when in doubt, shoot Adobe 1998 and convert to the output profiles.

Using the steps described in this series so far, you are well on your way to a slimmer, faster and more profitable work-flow. Barring any need for retouching, you should be able to go straight from camera to output and get a fantastic print.  Give it a try and let us know how it worked out for you.

Next week: Part 4. Picking the file format.

How to Get Great Color, Save Your Profits, and Never Have to Work Color or Density in Photoshop. Part 4

In the previous post in this series, I wrote about using sRGB for printing your studio work.
This post we talk about how JPEG can be your workflow friend.

Rule #4 – JPEG has benefits.
Shooting raw has its place. Like when the dynamic range of the scene far exceeds that of your camera. Or when you need to really fine-tune an image. But-if you are shooting raw because you aren’t getting good results in-camera with jpeg, please re-visit rules 1, 2, and 3. If you get the first three crucial elements in place, you won’t need raw for your portrait and senior work. Shooting in JPEG eliminates the steps required to convert from camera raw. If your image sensors are clean, and you have all the other elements in place you can send your files direct for printing/proofing without any further work, barring retouch or enhancements of course. This process may not be ideal for fine-art or landscape shooters, but it can be ideal for portrait and wedding shooters.

If you choose to shoot JPEG files, set your camera for maximum size files and the largest pixel dimensions. And be careful with just how much sharpening you allow the camera to apply. Too much sharpening and you might get too much pore detail on the closeups. Too little and the image will of course look soft. Excessive sharpening also limits just how large you can print the file before the sharpening artifacts become painfully obvious. Spend a little time testing now, and you’ll have the confidence to know later that your files will look great right out of the camera.

Rule #5 – Print on quality photographic paper.
This means professional paper. Not the over contrasty, over saturated non-neutral stuff you get from drug stores, discount marts, warehouse/membership stores. This means use a good pro lab. Not Costco, not Wal Mart, not Walgreens, not Drug Emporium, etc etc etc.

The papers you get from consumer mini-labs are purposely manufactured to NOT have accurate color. Yep, they make it screwy on purpose. You see, Joe Consumer likes prints with colors that aren’t real. They want false saturation and contrast for that extra snap. In most cases, their photos benefit from that assistance to help the snap-shot look a bit more appealing to the eye.

Professional paper is manufactured to very exacting standards to achieve neutral balance, correct saturation and excellent skin tones. Pro papers will handle extra saturation if you really need it for your “look”, so add it if you wish, but at least you have the option. And get this, just by using pro papers, you get an additional stop of shadow detail! That’s right, you get deeper blacks with pro papers. This means you can actually get a snappier looking print and hold shadow detail when your files are setup correctly.  A properly exposed, correctly white balanced image with great composition that is printed on professional photographic paper won’t need the artificial extra punch to compensate.


So there you have it, the keys to establishing a profitable and expedient workflow.

  1. For spot-on exposure and excellent detail use a professional incident meter, not TTL
  2. Perfect color comes from accurate white balance using a high-end accurate digital-ready target
  3. Using a colorspace that most closely matches your output device will speed up workflow and minimize color shifts
  4. For the studio, JPEG files will expedite your production and get you to print faster
  5. The most accurate color and deepest tonal ranges come from printing on professional papers.

We would love to hear how this all works out for you. Do you have other workflow tips you would like to share? Post them in the comments section.

Larger and Faster Storage is on the Horizon

Larger and faster storage is on the horizon!
At the current rate at which silicon-based technology doubles – approximately every 18-24 months, it won’t be long before our cameras outgrow their present storage form-factors. Nikon, SanDisk and Sony have announced their joint effort for a new portable storage specification aimed at meeting the future needs of music playback devices, digital cameras and video capture devices in a new standardized format.

The new proposed specs show a transfer rate of 500 Megabytes per second – far exceeding the present 167 Megabyte per second of the current CompactFlash specifications. Yes, that is a full gigabyte transferred every two seconds. The maximum theoretical storage capacity for the new devices are expected to exceed two Terabytes. These new memory cards are planned to be rugged, similar in size to the existing SD form-factor and have a lower power consumption and longer battery life – thanks to integrated power scaling. With the data speeds and power savings, I suspect we will see this new technology integrated as solid state drives (SSD’s) on laptops, smart phones, and other intelligent devices in sectors like medical and transportation. A projected production date for the new cards was not announced.

Getting the Best Possible Print from Your Fine Art Lab. Part 5 of 5

Getting to Know You!

Get to know the people who print your work.
A true fine-art class facility doesn’t just work for you, they work WITH you to get the print that satisfies your vision. Only you as the artist know exactly what you want in your print. Good communication skills can bridge a tremendous physical distance and result in a great print. Your master printer wants to know what you want in the print.

Testing is a critical step of this communication process.
Once a physical test has been printed, tangible suggestions can be made for changes. Get to know the lingo and the processes involved. The more you know, the more accuracy in your printer to artist communications and the less frustration has an opportunity to creep into your experiences.

Be open to hearing suggestions.
The printing technician is aware that this is your art. It’s your baby and your vision. The last thing they want to do is tread on that. Remember, they are here to print WITH you. The tech has likely printed countless thousands of fine art prints in their career and may have some truly outstanding suggestions that can elevate the print to unexpected regions. If you are willing to try their suggestions let them know that after seeing the results there is a possibility that you may want to go back to where you were. Then, if you don’t like the results, they will have been forwarned and thus prepared the files in such a way as to ensure a smooth transition back to the start.

You deserve a Great Print!
The countless hours spent by the artist from the time of exposure to the final print deserves to be rewarded. Hitting all the key points addressed in this series should bring the gift of an easier journey to a great print. If you partner your fine-tuned image file with a printer who understands how to elevate a file to a fine art print, your efforts will see even greater rewards. Sure you can still send your file to costco, or some mass production facility specializing in carnival prints, but where is the reward in that?

Getting the Best Possible Print from Your Fine Art Lab. Part 4 of 5

Getting to the final print: How much trust should you put in color profiles?

A few notes on profiles.
First, they are not a magic wand. Don’t expect them to make a so-so image look fantastic. They are NOT a repair tool, they are a color matching tool intended to get the output to mimic the actual contents of your file. Also, profiles are made by reading the values of sampled output of less than 1/100th of a percent of the colors available in 24 bit RGB. That leaves the remaining 99.99% of colors to be guessed at by the software that uses the profiles. Expect an improvement in color approximation, not miracles. The most predictable results occur when the working space and the printer profile are close in gamut. Meaning a large gamut Ektaholmes or ProRGB will convert less dependably to a smaller gamut device.If you are finding unpredictable results when using profiling, you may wish to consider using a smaller working space such as Adobe 1998 for future images.

Test and test again if needed.
While the digital age and color profiles appear on the surface to make all things equal, the truth is that a master printer is still required to get a master level print. Profiles may speed up the initial proofing process, but the finer nuances of a great print require a trained eye and a master of the craft. It is a very rare set of conditions that will come together in perfect alignment to allow a glorious print to happen with the very first test. In my opinion, a fine art print should leave zero room for improvement in the print. If you can sit with the print for a couple of days and not find anything to change, congratulations. Print your finals. An artist with a critical eye will always be seeking to improve their product. An acceptable print could be called and art print. It takes more than acceptable to get the tag of “Fine”.

Share your own experiences by leaving a comment!

Part 5: Getting to know you.

Getting the Best Possible Print from Your Fine Art Lab. Part 1 of 5

The end result of a great print is always the sum of it’s parts.

Every step along the way, from the click of the shutter through file preparation, all the way to print presentation choices, affect the visual appeal of the print. This author/artist believes that a fine art print does not lie strictly in the quality of composition and subject and use of light all brought together by the skill and talent of the artist, but also in a higher level of reproduction print quality.

Any factors that diminish the color fidelity and detail of an image, in my opinion, risk pushing the print away from fine art grade into Just Another Print. In other words, A fine image needs a fine print to qualify as fine art. Selling cheap, or poor prints as fine art is to me, analogous to selling posters as fine art.  The phrase “best possible” is a bit elusive, as “best” is often subjective. Meaning that you and I may have differing opinions of what an optimum print looks like. So knowing that the target may be moving subjectively, let’s look at what can be controlled to yield YOUR ideal of the perfect print.

Get the exposure right.

Proper exposure leads to the highest possible color fidelity with the greatest number of available levels of density. Under exposure leads to noise and grain in the image, while overexposure leads to loss of highlight information. Often we hear the cry of “I’ll just fix it in Photoshop!” While software offers us access to many tools that allow the user to attempt compensation for exposure issues, they will not fix the loss of fidelity or restore detail that is lost during improper exposure. The bulk of the density and color can be brought around from poor exposure to acceptable ranges, but the finer levels of information are lost forever. Use a quality calibrated hand-held meter or carefully watch your in-camera histograms to ensure your highlights, assuming your image is supposed to have them, fall below 100% white and you should be good to go.

Part 2: Is file format – tiff or jpeg –  important?

Leave me your comments. I would love to hear from you.