Getting the Best Possible Print from Your Fine Art Lab. Part 1 of 5

The end result of a great print is always the sum of it’s parts.

Every step along the way, from the click of the shutter through file preparation, all the way to print presentation choices, affect the visual appeal of the print. This author/artist believes that a fine art print does not lie strictly in the quality of composition and subject and use of light all brought together by the skill and talent of the artist, but also in a higher level of reproduction print quality.

Any factors that diminish the color fidelity and detail of an image, in my opinion, risk pushing the print away from fine art grade into Just Another Print. In other words, A fine image needs a fine print to qualify as fine art. Selling cheap, or poor prints as fine art is to me, analogous to selling posters as fine art.  The phrase “best possible” is a bit elusive, as “best” is often subjective. Meaning that you and I may have differing opinions of what an optimum print looks like. So knowing that the target may be moving subjectively, let’s look at what can be controlled to yield YOUR ideal of the perfect print.

Get the exposure right.

Proper exposure leads to the highest possible color fidelity with the greatest number of available levels of density. Under exposure leads to noise and grain in the image, while overexposure leads to loss of highlight information. Often we hear the cry of “I’ll just fix it in Photoshop!” While software offers us access to many tools that allow the user to attempt compensation for exposure issues, they will not fix the loss of fidelity or restore detail that is lost during improper exposure. The bulk of the density and color can be brought around from poor exposure to acceptable ranges, but the finer levels of information are lost forever. Use a quality calibrated hand-held meter or carefully watch your in-camera histograms to ensure your highlights, assuming your image is supposed to have them, fall below 100% white and you should be good to go.

Part 2: Is file format – tiff or jpeg –  important?

Leave me your comments. I would love to hear from you.

Getting the Best Possible Print from Your Fine Art Lab. Part 2 of 5

Is File Format Actually Important?

Last week in part 1, I wrote about a print being the total sum of all the parts in the workflow and how each part plays a role. We also touched on the importance of proper exposure for a good starting place. As promised, this week I expand the parts to cover gear and the common question of file formats.

Good gear.
If your lenses are of poor quality, don’t expect your images to be ready for fine art printing. Aberrations distortions and flares, like exposure, can only be somewhat compensated for, but not completely repaired in Photoshop. ANY distortion corrections in Photoshop means that your pixel data will be re-sampled. And re-sampled means it will be softened. Flairs, result in lowered contrast that equates to lessened detail, and repairing apo-chromatic errors requires re-sampling one or more channels. It’s preferred to handle this during raw conversion  but it still requires a re-averaging or re-sampling of pixel data.

File format.
For a fine art image, Unless jpeg artifacts are part of your style, (see my blog post on tiff versus jpg issues here) I recommend that the image be captured in an uncompressed raw format. Some camera manufacturers force users into either jpeg or compressed raw formats. For the wedding and portrait guys. This is usually fine. Their critical gamut for color lies mostly in the skin tone ranges of their subjects and the rest of the world is secondary. In a fine art print, the rest of the world is the artists domain and critical for color. JPEG compression throws color information away first at the higher quality levels, then moves on to also discarding density detail as the compression level increases. I have yet to see a digital camera that will hold the same level of color fidelity in the compressed file, that can be had in an uncompressed raw file. With the rapid pace of camera development, I imagine this issue will be corrected in a few years, if not sooner. I suppose we’ll just have to wait.

Do as much of your color correction, saturation work, density tuning and sharpening during the raw conversion process as you can.  Any resampling of color post-conversion can lead to lesser results when levels of density in each color channel are expanded, leaving gaps that cause rapid transitions in color, or compressed, causing a loss in color fidelity. Am I nit-picking here? Could be. But remember, the topic is getting the best possible print.  Nit-picking get’s you to that end. Shortcuts might get you an acceptable print, just not the best print possible.

File conversion.
The software used to convert your raw files can also go a long way to make or break your image.  For several years, I have been using Bibble Pro to convert my raw files. Side by side tests with current adobe products show that Bibble preserves more color fidelity and introduces virtually zero artifacts into my files. Adobe products appear to be using an interpolation scheme that sometimes creates zipper lines on hard edges and at other times, completely softens color detail in some of the channels.  When my distant Autumn aspen trees look like cotton candy in the red channel, missing all semblance of leaf detail, something is horribly wrong with the adobe raw converter.  Prior to final file work, I always convert my raw files to a tiff in a decently sized working space such as ProRGB or Adobe 1998. Especially for anything I will be printing on either photographically on the Lightjet or Pigment on watercolor or canvas.

Let me know your thoughts. I would love to hear your ideas.

Next from me: Sweetening the print through fine-tuning.

Toy Cameras: Holga and Diana

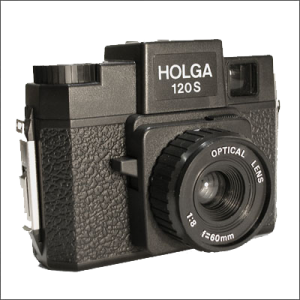
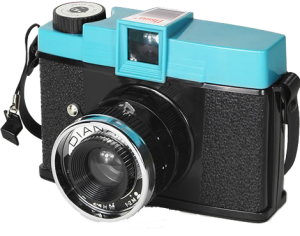
There are many different toy cameras out there, the most common ones being the Holga, theholga 120 Diana, and the Lomo LC-A.  So why are these cameras referred to as toys?  Well, cameras of this class usually include bodies and inner workings made of plastic, often the lenses are plastic too, giving images from these cameras their unique ethereal charm.  The lenses are fixed focal length, with limited aperture settings and shutter speeds.  The plastic construction of the camera is nowhere near as mechanically reliable as the expensive commercial cameras from makers such as Canon, Nikon, Olympus, Pentax and others.  With the toy cameras, there is a coveted tendency for light leaks and the el-cheapo plastic lenses are obviously not as crisp as expensive glass. These characteristics vary in quality and quantity in each camera, even within units of the same model.
I use mostly Holgas, and enjoy all 4 that I own, each for their individual traits; the light leaks are in different areas and the molded plastic lenses create different vignettes, blurs and lens-flairs.  This is why I find toy cameras to be so much fun; you just never know what you’re going to get.

Let’s quickly discuss some of the differences between the Holga and the Diana.
The Holga has several models to choose from: they have built-in flash, hot shoe adapters or no flash models, modified versions that use 35mm film or standard as 120 film, there are an abundance of accessories you can purchase for your Holga, or a number of modifications you can make to your Holga.  I will get into more detail with all of this in future posts.  The Holga has 2 aperture settings, labled as cloudy or sunny, which are so poor, they usually make little if any difference in exposure; a fixed lens; 4 focusing distances, labled as: individual (3ft), small group (6ft), large group (18ft) or mountains (30ft – infinity); 2 shutter settings, approximately 1/60 sec or bulb; it also comes with 2 film inserts, installed from the back, called masks, that alter the final image size on the film; a 4.5cm x 6cm and a 6cm x 6cm, although I prefer to shoot without the masks as they can decrease the light leaks.

The Diana has 2 versions, the original version (produced from the early 60’s thru the late 70’s) and a Diana cameranew version the Diana F+ (A re-production that entered the market in 2004).  The versions are basically the same except the newer Diana F+ has a nice pinhole function.  The original Diana shot 4cm x 4cm frames on a roll of 120 film, these cameras can still be found online or at flea markets, thrift stores or garage/estate sales, but because of their popularity, they command a premium price if the seller is aware of what they have.  Like the Holga, the new Diana F+ comes with film mask inserts, a 6cm x 6cm, a 4.5cm x 6cm, and an additional third mask, a 4cm x 4cm.  The Diana has 3 aperture settings, bright sunny, partly cloudy and cloudy, the Diana F+ has all of these plus pinhole; the Diana’s lens is a fixed lens, the Diana F+ has a removeable lens, so you can purchase different lenses and use them interchangeably; it is also possible to purchase a 35mm adapter back for the Diana F+.

I am so excited to share my love of toy cameras with you all.  Please come back and see what’s new.  I will be posting toy camera tips, tricks, holga and diana camera mods.  If there is anything in particular you want me to address add a comment to let me know.  See you soon!

How big can I print my file?

Here is another great question we hear quite often. Sometimes more than once a day. So it seems low resolution file showing pixelsa relative bit of information to pass along here to our blog reader friends.

There are two valid answers to this, depending on whether we look at this as a relative issue or a subjective one. As a relative issue, we use math to compare number of file pixels versus output resolution. Subjectively we look at quality as simply a matter of personal taste – what I like to call “The quality to pain threshold”. Or how big can we go before the quality drops to where it becomes painful to look at or pay for.

First, in either point of view, image quality is more than just the number of pixels contained in the medium resolutionfile. For a simple example; a modern 24 mega-pixel file shot out-of-focus will be of lesser quality than a properly focused 4 mega-pixel file.

Let’s look at the relative approach first, since most folks like easy and firm answers, such as 2+2 always = 4, and George Washington was the first US prez.

The easy answer is achieved with simple math:

File pixel dimension ÷ minimum input resolution = output dimension.

Consider this:
The example camera has a pixel dimensions of 2000×3000 (6 mega-pixel)
and the example device wants a minimum of 300 ppi (pixel per inch) file resolution.Full resolution file uncropped

2000÷300 = 6.66″
3000÷300 = 10.00″
The largest maximum quality print size would be: 6.67″ x 10.0″

If your printer recommends a minimum of 150 ppi:

2000÷150 = 13.33″
3000÷150 = 20.00″
The largest minimum quality print size is 13.33″ x 20″

If your file is from a 24 mega-pixel camera with dimensions of 4000×6000:

4000÷150 = 26.66″
6000÷150 = 40.00″
The largest minimum quality print size would be 26.66″ x 40.00″

With the subjective approach, there are limited fixed answers. The size of output is usually limited by one or more of the following factors:

* The physical limitations of the printing device.
* Your budget.
* How ugly you are willing to accept it.

At some point the cost of the print will break your budget. That is a hard and fast limitation. So that’s easy – you can print as big as you want to go as long as you can afford the print.
The printing device or medium will support a maximum specific size. For instance, some ink jets will not print any larger than 40″ wide, but they will go several hundred inches long. You can’t go any larger unless you pick a different printing device or you print in multiple tiles and deal with matching the seams. If you are willing to do the latter, then your budget is again your limit.

The subjectivity comes in with your opinion. How big is too big before the quality drops below your level of acceptance – your threshold of pain. Or you might call it the “Yuck factor”. When you get to a level of enlargement that degrades the quality to a point where you don’t like the results, you have hit your threshold of pain. In essence, you see the print and say “Yuck! That’s one ugly print and I’m not willing to pay money for it”

What does the yuck point look like? I can’t answer that for you, only you can. My level of acceptability may be different than yours. A professional’s need for quality is likely higher than that of the average consumer due to experience and training. Because of this experience, the professional will usually hit his/her level of pain sooner than the consumer.

Digital Photographs: Lost but not Forgotten

I just can’t help it when I see articles about lost photographs. I feel the urge to expose someone Balancing act with street performerselse’s pain on to everyone and anyone who cares to listen. Last week I wrote about saving your memories (photo albums) from a natural disaster like the fires in Boulder Canyon here in Colorado. People have been rescuing their photos for many years by grabbing their “photo albums” and running for safety.

I personally have not read about anyone grabbing their computer, CD’s or whatever they have their digital photo’s on and running out of the house. It’s probably happened somewhere and I would hope people would consider their digital images to be just as valuable as their printed photo albums. Then again, we are in the digital age where people share their photos on face book and cellphones and never even consider a print as a way to show off an image.

Consider this story I read in the Denver Post just this week. A staff writer misplaced her cellphone one morning on the way to work. Was it forgotten at the gas station, left under a pile of stuff in the car or misplaced at home somewhere? Either way by the end of the article it still was not found. Several things run through a persons head when their cell phone goes missing like what about all the information I have stored in there? It’s not only a hassle to replace but time and expense too, at least for what you can replace.

This writer mentioned being distraught over several photos taken with the MIA phone that could not be replaced. Maybe not life changing images but something deemed worthy of taking and saving in the first place. The fact that so many cell phones are lost, broken or destroyed every day that contain photographs that will never see the light of day again makes me pucker, at least a little bit but probably not as much as the person that lost them but it’s still not a pleasant experience. So what’s the moral of the story here? No moral, just an observation from me about how photography has become such a disposable act anymore. People shoot like crazy because it’s fun to record images of events and people’s lives they are part of. The sad thing is that when a new cell phone/camera model comes out those images are usually not saved. As I have been told by more teens and twenty-somethings than I care to remember, “it’s no big deal, we’ll just shoot more!” I hope they all have really good photographic memories because that’s all they may have in the future.

Digital Image Archiving – The Lost Generation Part 2

So far, all the digital archiving solutions we discussed in part 1 have their pro’s and con’s. Mostly con’s. What’s left? How about a good old fashioned print! If you make a good quality print, note I said ‘quality’ print, not a cheapo inkjet that will fade faster than American Idol winners, you can be good to go with just a simple shoe box to hold all your precious memories. OK, so maybe not a real shoe box although I’m willing to bet my New Balance sneaker box full of prints will outlast any of the digital storage solutions currently available. Did you know you can buy, cheaply I might add, photo storage boxes in all variety of sizes? Most are made of archival acid free paper, have dividers and give you (or your decendants) access to actually see them whenever you want with no batteries required. How about an album? There’s nothing like a good photo album to thumb through. That tactile quality can never be replaced.

I was recently at a family reunion being held in a local park. One of the Aunt’s brought a stack of photo albums which consisted mainly of old photos of past family members and deceased pets. People were grabbing them left and right to look through the pages, laugh at their relatives and ask over and over “who this that with so and so”? It really draws a crowd and certainly helped those present feel much more connected to the family. Then I noticed a few digital cameras floating around, people taking snaps, a few videos and a lot of chimping. If you have not heard of chimping, it’s the process of looking at your photos on the camera typically right after shooting them. So called because if you really look at someone doing it they really do look like a chimpanzee all hunched over and staring with wonder at the tiny magic screen. Anyway, back to the family chimps. What I noticed is that the photo albums stopped right around when the digital age hit. There were a few awful ink jet prints made by Auntie so and so but not many. According to them, most of their recent photos were either on their computer somewhere or still in the camera. Hmmm.

Now I am not suggesting you print every shot you take, although from a lab’s perspective that would be pretty cool. Just print the important stuff. The photo’s you want to pass on to future generations, the photo’s you want to be remembered for. I also suggest you don’t hide them in the attic or basement. Leave one or two albums laying around, see what happens when family or friends come over. Bet someone picks one up and starts going through it. Makes for great conversation and reminiscing over those good times you all shared. Sure beats having everyone huddle (think chimp) around a laptop or I-pad, if that would even happen. Whatever you do, just print it, put it in an album, in a box, even in a pile but just print it. The only true way to archive your photographs and for the future all of mankind!

You will still want to keep your digital ‘originals’ somewhere but if you only share them on Facebook, flickr, e-mail’s and what-not, understand that these are all very short term options. The sooner you start thinking about a long term archiving solution the easier it’s gong to be.

Tell us what you think and what you are doing to preserve your memories. Here is a resource for archiving digital files, mostly for professionals but really it applies to anyone who shoots digital photographs and does not want to be part of the lost generation.
http://dpbestflow.org/data-storage-hardware/storage-hardware-overview

Digital Image Archiving – The Lost Generation Part 1

Are your images a ticking time-bomb?

There has been a lot of chatter between the photo labs and digital imaging professionals the past few years. We all fully expect many digital photographers including pros, amateurs and even the family archivist who we affectionately call Digital Debbies, to completely loose a whole generation of images. Gone, Adiós, Sayonara, Bub bye! Why you ask? If not you should be. It used to be fairly simple to store and archive your film images whether you used archival pages, slide boxes or just printed them. Some people went as far as to store them off site or in fire proof safes and for the most important of images, you could have duplicates made. Either way, you could actually see them whenever you wanted. It’s easy to reproduce film, always will be. Now in the digital age we can shoot like crazy onto huge memory cards because it’s inexpensive, practically free in fact. Well, now what do you do with all of these shots? I hear of people who burn them off to CD/DVD’s, store them on external hard drives or even just use the memory cards as a storage device. Heck, many people of a certain age group don’t store or keep their photos at all, they just shoot for instant gratification and move on, but that’s another story we’ll investigate later. With the cost of storage so inexpensive all of these are viable solutions except for one detail. None of these are anywhere near as secure as film storage for several reasons. First, CD/DVD disks can and do fail, even the finest ‘gold’ disks. Hard drives fail all the time and with the mammoth size of current models you could be putting thousands of images at risk and all on one device. Now let’s assume for the moment that your CD/DVD or HD does not fail. So far so good. Imagine 10, 20 or even 50 years into the future. What’s the chance you or whoever has possession of your images will have access to a device to read any of these disks. I can promise you that CD/DVD readers will not be around that long and very possibly they will have no way to connect that external HD to a computer because USB is long gone. Will new cameras or card readers still be compatible with SD, CF and other current memory cards? There is a good chance all these images, possibly 100’s of thousands will not be accessible.

OK so maybe now you realize that you will become that Grandpa or Grandma with zillions of images in your attic and your relatives will climb up there to discover this treasure trove of personal and family history and possibly even your professional career’s cache of photos. Now what? Can’t see em, can’t read the disks, can’t reminisce over all the beautiful photos you took over your digital lifetime. Bummer, now there dumpster fodder! Maybe someone will take the time, effort and expense to find a guy who can recover these images, maybe not. So what’s a digital photographer to do? Well, you could keep copying all your images from device to device to keep them stored on current technology. Can you even imagine how exponentially labor intensive this will get, even in just a few years! No way!! No one is going to go through all that hassle. Option 2, store everything with a cloud based operation or with one of the off site storage companies that currently offer this service for a monthly fee. Some even have redundant storage for extra security. Not a bad idea, sounds easy anyway except for the horror stories we have heard when one of these guys goes out of business and with a flick of the switch your photos are gone. Yes, many people have been able to retrieve their images but your still back in the same boat as before.

We also are told many people actually use facebook, flickr and the like to store/archive all their images. How long do you really expect them to be around? They may be here for some time but free storage of all your photographs for life is not something anyone should count on. How many people realize that facebook automatically downsizes your files when uploaded? Forget any large files let alone Raw, PSD, etc. Any designer out there working in Illustrator, Quark, Corel, or CS whatever also needs to pay attention. All of your work both personal and professional is at risk. So what’s the solution? I am interested in hearing what anyone else thinks and what they are currently doing.

Next post look for part 2 of Digital Image Archiving: The Lost Generation

What “they” might not be telling you about the flaws in ICC profiled workflows.

Profiles are typically generated using less than .016% (yes that is less than 16/1000 of one percent!) or 16/100,000 of the 16.4 million colors available in 8bit RGB. Talk about a shot in the dark. There is a tremendous amount of mathematical software based “guessing” that occurs in the ICC color management process.

Profiles are 100% dependent on consistency. They only work if you have consistent input and consistent output. Lenses used in capture, accuracy of camera white-balance calibration, scanner calibration, conditions in process, paper, chemistry, ink, equipment condition, light sources, supply voltages, time of day, humidity, blah blah blah can all have an impact on product output or digital input. These conditions are all subject to change, and do change. Thus, profiles are at their most “accurate” for the moment the profile was created. As these conditions drift and change over time, they effect the “accuracy” of the profile. Many individuals in our industry have touted that profiles have an expectation of consistency. One that unfortunately just does not exist in real world conditions. Through equipment care and high levels of professional level calibrations we attempt to keep our input/output equipment “calibrated” to the same standards on which the profile is based. In theory, this causes the final output to float around the bull’s eye and stay close to the expected, rather than take a direct bee-line away from it and continually get further off-target.
A good lab will calibrate their devices back to factory standards several times during a production day.  This is done to compensate for process variables that occur over time, and changes in paper from batch to batch.
My goal here is to help you become aware that though profiles are often elevated to a high stature as an end all solution,  they really fit more into a false-god category.

Now this is not to say that profiles are useless. Far from it in fact. They can have a dramatic impact on overall color approximation across multiple devices. Such as getting your ink jet to approximate your file and to get our LightJets to approximate that very same file. In fact we use profiles in-house to get our LightJets to approximate the smaller sRGB color space of the Fuji Frontier prints. Due to the larger available gamut of the LightJet, it is more likely to get the LightJet to approximate the Frontier than the other way-round. And we use them in some profile dependent work flows such as our professional digital press, and our Durst Sigma scans. The software that drives these devices, will not function correctly without profiles in place. The truth is, most digital capture and print sotware have some sort of embedded profiling built in. Your digital camera for instance, needs to know the characteristics of the dyes used to filter the image sensor in order to deliver a density and color accurate file.
I believe that any NON-DESTRUCTIVE method of producing better color has the potential to be a good idea. I’ll again stress “NON-DESTRUCTIVE”.  I am a big proponent on avoiding color channel damage whenever possible.  The caveat to forcing a profile on an image is it’s potential for color channel damage. I have seen many files where the colors were pushed too close to 100% saturation prior to a profile conversion. The resulting breaks/banding is inevitably and incorrectly blamed on the profile.

The great thing about ICC profiles in your work flow is their potential to get you closer to your target. They are by no means any guarantee of a bull’s eye, an exact match, perfect color, or any other false promise you have heard or at this point still believe. I often use this analogy: “Profiles are like a ticket to a baseball game. They get us in the gate, and might just get us a good seat, but that ticket will never allow us to sit on home plate while the batter hits a homer. BUT, that good seat is still much better than listening to the game on the AM radio while sitting in the parking lot.”

So, better. It’s just not a guarantee.
Profiles, in a nutshell, describe the devices available boundary or gamut as well as the limitations or inaccuracies and should not ever be confused with or used as working color spaces. They are far too small for use as a working space and should be thought of something to move colors <to> not <within>. Banding/breaking/clipping will likely result if you should choose to ignore this. It is best practice to use a working space that is larger than the output space, then allow your profile conversion to remap to hold detail.

If you remember my remarks regarding consistency, these constant changes diminish profile accuracy.  So why do we make a profile available for our printers? Well, quite frankly, because in most cases, an perceived improvement in print quality will result from a proper color-managed workflow.

One exception to this is our Fuji Frontier. This device is specifically calibrated to work within the sRGB colorspace. It’s output gamut is limited of course by the capabilities of Fuji Crystal Archive paper, but this design will allow a photographer who is color-calibrated and working in sRGB to be free of output profiles. One less layer of potential damage to the file.
So how should you be using your profiles?

Let’s start with what NOT to do.

If I use profiles in an attempt to get one device to approximate the characteristics of another device, I am in essence, attempting to get device A to look like device B, and both devices inaccuracies will be included! This is a great example of Square Peg I A Round Hole. If the gamut (outside edges of the pegs) of device A do not match the gamut (profile outliers) of device B, loss will occur. Much like using a hammer to get that peg in – you’ll shave off some of the peg, and what is left does not completely fill the hole.

In fig.1 above, the LightJet Fuji Matte has the larger gamut.The darker looking cube inside that area is the gamut of the Epson Enhanced matte. The bit of gray peeking out at the bottom is the zone where the Epson’s gamut is a bit larger than the LightJet. The area labeled Profile Overlap represents the available colors that both devices share. So this would be the available gamut when trying to match one of the devices to the other. In other words, all of the areas outside the overlap would be lost. In my opinion, that is a pretty large chunk of color to toss away just for the gratification of getting two prints to look as close as possible to one-another.  In essence, we would be “dumbing-down” the quality of our final print.

Good profile methods will attempt to “re-map” or squeeze those outside colors to fit within the range of output (the square hole), but the missing colors (the corners) aren’t properly restored. This results in a sacrifice of color fidelity from the original file.

So if you still want to profile, this is how I approach ICC profiling for Maximum Color Fidelity. At least within the limits resulting from profiling.

Let’s assume that we have:

– A source file: test.jpg
– Ink jet printer A that lets say: prints Blues with too much Green,
– and I have printer B that prints Reds with too much Yellow.

So:
A) +Green cast in Blues = Damaged Color
B) +Yellow cast in Reds = Damaged Color
ICC Profiles = Attempted Damage Reversal (at least in theory anyway)

Example 1: Try to get Printer B to look like printer A with one profile – bad Idea

If I print test.jpg on B, trying to approximate A via A’s ICC Profile, I have a print that has the native issues of too much Yellow in the Reds, and because we told B to look like A, I also have too much Green in the Blues. Why would I want a print with both sets of issues?
Damaged Color + Damaged Color = MORE Damaged Color.

Example 2:  Try to get Printer B to look like printer A with two profiles – best idea for closest approximation between printers 

I print test.jpg using profiles for both printers. I tell my software to make B look like A, but use B’s profile too.
So now the output attempts to remove B’s issues, the Yellow cast from the Reds.
BUT, because I am still approximating printer A, I am still introducing the Green cast in the Blues. So now I have at least one printers issues in full glory.
Damaged Color + (Damaged Color + Attempted Damage Reversal) = Damaged Color. Still some loss, but I should have two prints that are fairly close.

Example 3:  Try to get Printers A and B to look like the source file – best idea for maximum fidelity to source file.

Rather than attempting to get A to approximate B, We print the file to each printer, avoiding an approximation between the printers.
Instead, we want to allow each printer to get as close to test.jpg as possible. So we print test.jpg to A with it’s profile and to B with it’s profile.
A) Damaged Color + Attempted Damage Reversal = Less Damage.
B) Damaged Color + Attempted Damage Reversal = Less Damage.

So rather than compounding issues or keeping some and removing some, in theory, both prints are now as close as they independently can be to the original contents of the test.jpg file.


TIP!

Nothing in nature is saturated to 100% of any given color. There will always be some absorption of wavelengths of all colors. So don’t push your files thinking the final product will still be believable or still hold detail. The closer to 100% you push the saturation, the closer to zero you push the detail. And please don’t blame your profiles for damaging a file that was pushed too far.  Perceptual profiling is just not designed to work with a lack of color fidelity and you just might be wasting your hard earned cash to get a print you don’t like.

If your preference is hyper-saturation, make sure to match image type to printer type. For example, if you like saturated yellows, you could be printing to a device that can actually reproduce the brilliance you are seeking. Giclee printers are a great example of this. Being an ink-jet, they are quite capable of reproducing intense yellow as this is one of the native ink colors on the device.The same holds true for the other two colors, Cyan and Magenta. When you add any two or more inks together to create a new color, you are adding density and reducing saturation. With the advent of the intermediate “photo” colors, some of the subtler in-between colors are now improved. On the LightJet, the Kodak Metallic paper holds more saturation than Fuji Crystal Archive, but the blacks are not as rich nor as neutral.